BeagleBone Black: Ubuntu Getting Started
- ubuntu
- beaglebone-black
I was really intrigued by the BeagleBone Black's (BBB) low cost, great performance, and IO all on the familiar Ubuntu OS. I am still quite new to the BeagleBone Black and hope to create some great projects with it in the future.
This is a quick guide to get you up and running with Ubuntu on your BeagleBone Black. I created this guide because many of the guides and instructions are scattered across many places and I wanted a concise place to reference.
Flashing/Installing Ubuntu on your BeagleBone Black
Download the latest Ubuntu image. Pick the latest .img.xz file (on the bottom) from the rcn-ee site
ex.
http://rcn-ee.net/deb/flasher/saucy/BBB-eMMC-flasher-ubuntu-13.10-2014-03-27-2gb.img.xz
Extract the .img.xz download to get the .img file. You can use 7zip to extract it. If you didn't add the extension when installing 7zip: Open With -> 7zip -> 7zFM.exe
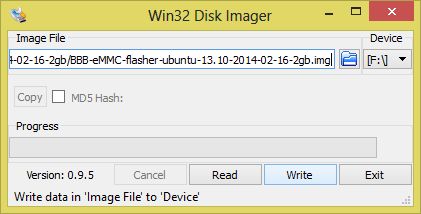
Download and install Win32 Disk Imager.
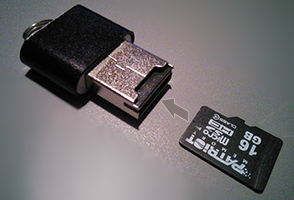
Plug in your microSD card that is at least 8gb. You can use any adapter or USB card reader. Look at the file explorer to find the drive letter.
Start Win32 Disk Imager and browse for the .img file. Select the correct drive letter from the drop down.
This process will rewrite all data on the microSD card so make sure you backup anything you might want on it.
Press the Write button. The process will take a bit of time and will come up with write complete dialog when done.
Safely Remove the microSD from your computer. Make sure your BeagleBone Black is shutdown and not powered. Also unplug the ethernet because it consumes a bit of power.
Plug in the microSD into the BBB. While you hold the User Boot (S2) button down, plug in power to the board via USB or 5v adapter. The 4 lights should light up then change away. After that you can release User Boot button.
The flashing process should take about 25-45 minutes. There is not a good way to tell if it actually flashing. When I did it the D2(0) and D4(3) LEDs were blinking a lot. When the process is done, the blinking should completely stop and ALL 4 LEDs will be lit up.
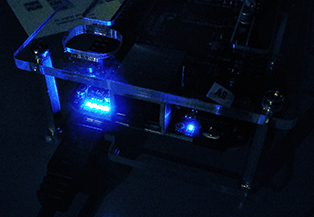
Note: If after 45 minutes, the LEDs are still not solid, power off the board (hold the power button down for ~8 seconds, until all the LEDs turn off) and try again.
Power off the board (power button, 8 seconds). Remove the microSD card.
Power the board back on and you should be able to play with Ubuntu now!
Keep in mind that this is not Ubuntu Desktop; If you plug in the micro-hdmi, you will see the same stuff as you do when you SSH into your board with PuTTY.
More? Getting Started
SSH into your board
When your plug in your board via USB, it should show up as a flash drive (mass storage). Make sure you go through the Start.htm and install all of the necessary drivers including the USB to virtual Ethernet driver. If you are running Windows 8, use these instructions on how to install unsigned drivers.
If you're used to SSHing into things, here is the command you can run:
ssh [email protected]
# password is "temppwd"
Otherwise, here is a GUI program on how to accomplish the same thing:
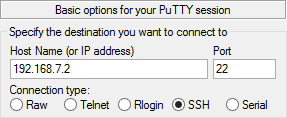
- Visit the BBB IP (will probably be
192.168.7.2). You can find it in theStart.htm(under step #3) but you can just openBASIC_START.htmand it will redirect you to it. - Open your favorite SSH program of choice. We're going to be using PuTTY
- In the
Host Name (or IP Address)field, enter your BBB IP. - Change the connection type to
SSHand make sure thePortfield is 22.
- Click the
Openbutton at the bottom to start your session. It will ask about SSH key stuff if you are accessing for the first time, just click accept/yes/save. - For the
login asprompt, Enterubuntuand press enter. - For the password, enter
temppwdbecause this is the default. - Change the default password so others can not login:
passwd- Enter in the current in the current password
temppwd. Then your new password twice.
- Enter in the current in the current password
Create your own root user
- SSH into your BBB (see instructions above)
- Add a user:
sudo adduser yourownusernamehere - Edit the sudo configuration:
sudo visudo - Use the arrow keys and find the section that looks like this:
# User privilege specification root ALL=(ALL:ALL) ALL - Add root privileges to your new user. Under that section add the following line:
yourownusernamehere ALL=(ALL:ALL) ALL Ctrl+xto exit. Typey, enter. And finally pressEnterto complete the save.
Update/Upgrade
Get all of your current programs/packages up to date.
Plug in an ethernet cable to your BBB and connect it to something internet access(router, switch). Alternatively you can share your PC/laptop internet connection via USB to your BBB (see section below on how to do this).
Test internet connection by running these commands:
ping 8.8.8.8Try to connect to Google directly via IPping google.comTry to connect to Google via DNS nameserversCtrl+zto stop pinging
Run the following commands. You may need to type y and enter along the process to confirm some actions.
sudo apt-get update
sudo apt-get upgrade
Share internet over USB
In Windows, goto Control Panel -> Network and Internet -> Network and Sharing Center -> Change Adapter Settings (on the left).
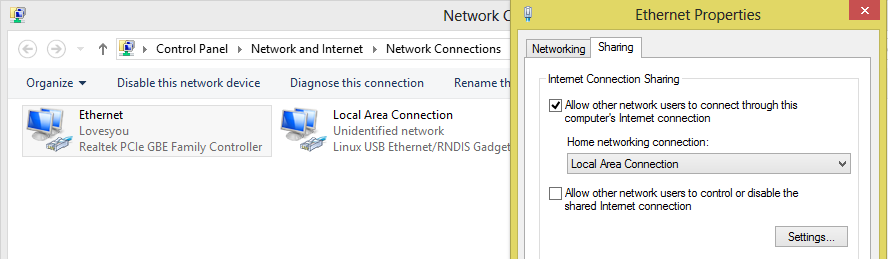
Right-click on your connection with internet(wired or wireless) and click Properties. Go to the Sharing tab and check Allow other network users to connect through this computer's Internet connection. In the selection box choose the BBB virtual local area connection. Press OK.
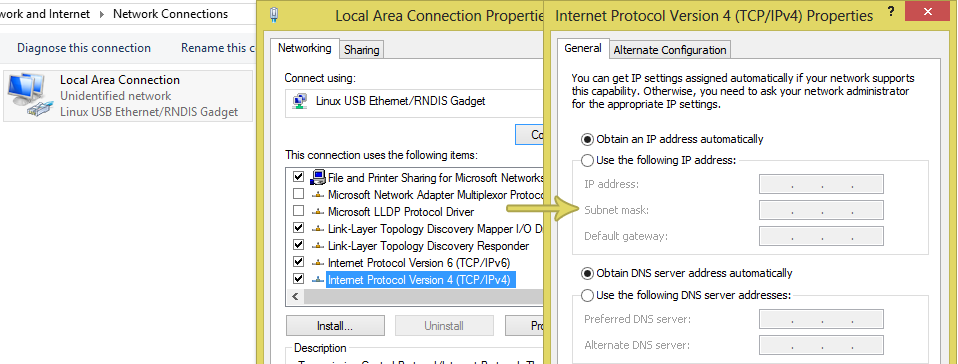
For some reason Windows will assign a static IP to the virtual local area connection. So right-click your BBB local area connection and click properties. In the list, select Internet Protocol Version 4 (TCP/IPv4), and click the Properties button. In the General tag, change both the IP and DNS to Obtain automatically. Press OK, Close.
Then on the BBB side:
- On your BBB, run this command to temporarily set your BBB's default gateway:
sudo route add default gw 192.168.7.1 - Add a nameserver so we can reach domains:
sudo nano /etc/resolv.conf - Add
nameserver 192.168.7.1to the bottom of the list.192.168.7.1is the IP the BBB sees as the computer it is connected to.
- Test internet connection by running these commands:
ping 8.8.8.8Try to connect to Google directly via IPping google.comTry to connect to Google via DNS nameserversCtrl+zto stop pinging
I had some trouble trying to get the BBB to ping when I first set this up. I thought it was a firewall(or Norton's(anti-virus) firewall) blocking ICMP echo request packets but I added some traffic rules and it didn't change anything. Plus, I can ping on my Windows 8 PC that I am sharing the connection with. I fixed this issue by changing the TCP/IPv4 settings of the connection with Internet and that we are sharing to something manual, saving, then switching back to automatic. I am not sure why this fixes it.
Command cheat sheet
| Command | Description |
|---|---|
su newusername | Switch users |
sudo shutdown -h now | Shutdown the BBB |
Extra Links:
Update (2016-6-4): here are some links on using Debian 8.4 Jessie
- Updating a BeagleBone Black to Debian Jessie by Anna Gerber
- BeagleBoneBlack Debian images (console, iot, lxqt)
- Flashing eMMC, Embedded Linux Wiki