Using libuv with Windows and Visual Studio: Getting Started
- windows
- c++
- libuv
libuv is a multi-platform support library with a focus on asynchronous I/O. It was primarily developed for use by Node.js, but it's also used by Luvit, Julia, pyuv, and others.
![]()
tldr: cross-platform console/terminal niceties
I was interested in this library because it has support for ANSI escape code controlled TTY which Windows doesn't really support on its own. This means cross-platform colored text. libuv is what Node.js uses for all of the CMD/console/terminal/shell niceness across platforms.
I found this library confusing and hard to get started with so I decided to consolidate various resources down to this simple tutorial.

Guide to Colored Text with libuv
This guide will go over getting started and setting up a project to work with libuv. By the end, you will be outputting colored text in a console window.
Download libuv
Download or clone libuv from the GitHub Repo. I used the "Download zip" button.
You will need Python 2.7 and Visual Studio(I am using Visual Studio Community 2013) installed.
Build libuv
Navigate to where you extracted libuv. Launch CMD prompt or PowerShell and run:
vcbuild.bat
This call will generate Debug/lib/libuv.lib.
[It also] will checkout the GYP code into build/gyp and generate uv.sln as well as related project files.
For more information, see the build instructions in the repo README.
Create an Empty VS Project
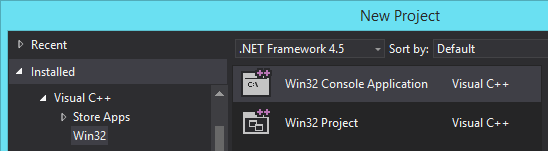
Make a new Visual Studio Console application. Under Installed -> Visual C++ -> Win32 -> Select Win32 Console Application (Visual C++)
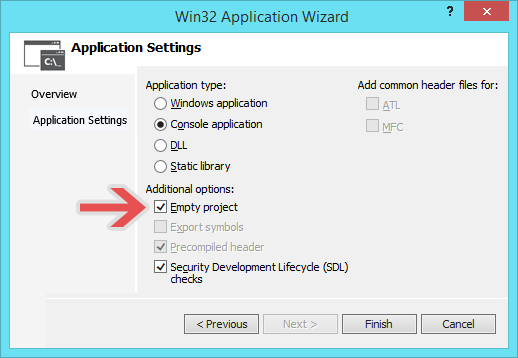
Press "Next" on the following screen, then check the "Empty Project" checkbox in the Win32 Application Wizard.
Copy over the libuv include folder and Debug/lib/libuv.lib that were generated from the build into your VS project directory.
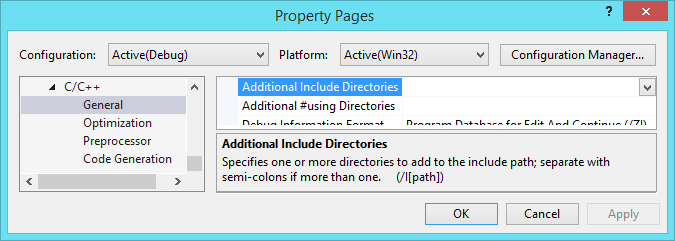
Go to: Project Properties -> C/C++ -> Additional Include Directories. Then add an entry for the include folder we just copied over.
Right click on the project and go to Add -> Existing Item. Select the lib/libuv.lib that was also copied over in a previous step.
At this point, if you try to build, you will probably get a bunch "already defined" errors.
Go to: Project Properties -> Linker -> Input -> Ignore Specific Default Libraries and add LIBCMTD.lib. Thanks to AnT's answer on Stack Overflow for that tidbit.

Create a new file for the main part of the program
Make a new project source file: Right click on the "Source Files" folder in the Solutions Explorer and click Add -> New Item. Name it main.cpp.
Once you have the code below pasted in and saved, build the project. You can use Ctrl+F5 to make the console stay open.
main.cpp
The code is based on the simple example from the TTY section in the Utilities chapter of An Introduction to libuv.
It should spit out some cyan text on a blue background:

#pragma comment (lib, "libuv.lib")
#pragma comment (lib, "ws2_32.lib")
#pragma comment(lib, "psapi.lib")
#pragma comment(lib, "Iphlpapi.lib")

#include <iostream>
//#include <stdio.h>
#include <string.h>
//#include <unistd.h>
//#include <io.h>
#include <uv.h>

uv_loop_t *loop;
uv_tty_t tty;
int main() {
	loop = uv_default_loop();

	uv_tty_init(loop, &tty, 1, 0);
	uv_tty_set_mode(&tty, UV_TTY_MODE_NORMAL);

	// Set as cyan text on blue background
	if(uv_guess_handle(1) == UV_TTY) {
		uv_write_t req;
		uv_buf_t buf;
		//buf.base = "\033[41;37m";
		buf.base = "\033[44;36m";
		buf.len = strlen(buf.base);
		uv_write(&req, (uv_stream_t*)&tty, &buf, 1, NULL);
	}

	// Spit out the text
	uv_write_t req;
	uv_buf_t buf;
	buf.base = "Hello TTY\n";
	buf.len = strlen(buf.base);
	uv_write(&req, (uv_stream_t*)&tty, &buf, 1, NULL);

	// Reset any ANSI styles from above
	if (uv_guess_handle(1) == UV_TTY) {
		uv_write_t req;
		uv_buf_t buf;
		buf.base = "\033[0m";
		buf.len = strlen(buf.base);
		uv_write(&req, (uv_stream_t*)&tty, &buf, 1, NULL);
	}

	uv_tty_reset_mode();
	return uv_run(loop, UV_RUN_DEFAULT);

	return 0;
}
Going further
Instead of having to write this 5-line monstrosity(below) every time you want to output something, I created a nice helper function, ccout which is "color cout".
uv_write_t req;
uv_buf_t buf;
buf.base = "Hello TTY\n";
buf.len = strlen(buf.base);
uv_write(&req, (uv_stream_t*)&tty, &buf, 1, NULL);
Usage:
ccout("asdf\n", &uv_write_t(), (uv_stream_t*)&tty);
// Some ANSI colors
ccout("\033[41;37mHello TTY\n\033[0m", &uv_write_t(), (uv_stream_t*)&tty);
cccout Code
#include <string.h>
#include <regex>

std::string stripAnsiEscapeCodes(std::string input) {
	// from: https://github.com/sindresorhus/ansi-regex/blob/47fb974630af70998157b30fad6eb5e5bd7c7cd6/index.js
	std::regex reg("(?:(?:\033\\[)|\233)(?:(?:[0-9]{1,3})?(?:(?:;[0-9]{0,3})*)?[A-M|f-m])|\033[A-M]");
	std::string output = std::regex_replace(input, reg, "");

	return output;
}

void ccout(std::string message, uv_write_t* req, uv_stream_t* handle) {
	// If the terminal doesn't support ANSI, strip it for clarity
	if (uv_guess_handle(1) != UV_TTY) {
		message = stripAnsiEscapeCodes(message);
	}

	uv_buf_t buf;
	buf.base = (char*)message.c_str();
	buf.len = strlen(buf.base);
	uv_write(req, handle, &buf, 1, NULL);
};
ANSI Escape codes
The ANSI escape code Wikipedia page covers all of the nitty gritty details. Below are some of the basics you will probably want to use.
Reset/Default
\033[0m: Reset all attributes. It is good practice to put this at the end so that you don't step on anyone's toes.
Here is a breakdown of this escape sequence:
\033[: Control Sequence Introducer\033is the ESC character.- decimal:
27 - hexadecimal:
\x1B - octal:
\033
- decimal:
[: left bracket
0: SGR parameter code for Reset/Normal or "all attributes off"m: Select Graphic Rendition(SGR). Sets SGR parameters, including text color.
Color
30-37: Text/foreground color90-97(not standard) for high intensity
40–47: Background color100-107(not standard) for high intensity
High intensity can also be achieved in a more standard way by using a normal color alongside the bold(1) code. ex \033[31;1mHeya. RedBold\033[0m
| Color (SGR) | Text/Foreground Code | Background Code |
|---|---|---|
| Black | 30 | 40 |
| Red | 31 | 41 |
| Green | 32 | 42 |
| Yellow | 33 | 43 |
| Blue | 34 | 44 |
| Magenta | 35 | 45 |
| Cyan | 36 | 46 |
| White | 37 | 47 |
Here is the code I used to generate the image above:
std::string colorStringNormal = "";
std::string colorStringCodeIndexNormal = "";
std::string colorStringBold = "";
std::string colorStringCodeIndexBold = "";
std::string colorStringHighIntensity = "";
std::string colorStringCodeIndexHighIntensity = "";

for (int i = 0; i < 8; i++) {
	colorStringNormal += "\033[" + std::to_string(30 + i) + "mHeya\t\033[0m";
	colorStringCodeIndexNormal += std::to_string(30 + i) + "\t";

	colorStringBold += "\033[" + std::to_string(30 + i) + ";1mHeya\t\033[0m";
	colorStringCodeIndexBold += std::to_string(30 + i) + ";1\t";

	colorStringHighIntensity += "\033[" + std::to_string(90 + i) + "mHeya\t\033[0m";
	colorStringCodeIndexHighIntensity += std::to_string(90 + i) + "\t";
}

ccout(colorStringNormal + "\n", &uv_write_t(), (uv_stream_t*)&tty);
ccout(colorStringCodeIndexNormal + "\n", &uv_write_t(), (uv_stream_t*)&tty);
ccout(colorStringBold + "\n", &uv_write_t(), (uv_stream_t*)&tty);
ccout(colorStringCodeIndexBold + "\n", &uv_write_t(), (uv_stream_t*)&tty);
ccout(colorStringHighIntensity + "\n", &uv_write_t(), (uv_stream_t*)&tty);
ccout(colorStringCodeIndexHighIntensity + "\n", &uv_write_t(), (uv_stream_t*)&tty);
Learn more about libuv
- libuv API docs
- An Introduction to libuv (uvbook)
- learnuv by Thorsten Lorenz. I have not used this one, but it seems comprehensive.