Render Components and Modular UI: Getting Started (RequireJS)
- coherent-ui
- html
- css
- javascript
- unity-3d
- requirejs
I discovered
Render Componentsfrom Guy Bedford in an email exchange where he laid out some basic code for the concept. Bedford has a small writeup on the ZestJS site, but this guide will cover all the same points. Because there is no written spec forRender Components, this guide covers one way of implementing this concept/idea. Details like naming conventions might not be the exact same as someone else.
This guide will go over building a pseudo-YouTube video site and workflow setup to start using Render Components.
Render components are applicable in many situations, including game UI. Game UI is just like a single page web app. I used render components in Unity with Coherent UI for my games, Radius and Super Bounce. You can check them out on GitHub.
About Render Components
Benefits of Render Components:
- Modular: Code organization
- No hassle Module Dependencies: Dependencies flow with the module; No need to worry about injecting them yourself. A neat little bundle of code.
- Reusable, Shareable code: Reuse modules throughout and even between apps
- Easy to follow file/folder structure: Although you don't have to conform to the folder structure in this guide, it makes it easy to find any module or sub-module.
- Seamless binding: Elements can be bound to your JavaScript without any hassle.
A Render Component is simply a JavaScript object with two functions, template and attach.
template: Returns a template string. This will most likely be a Handlebars template but any template system is supported by currying.context: A JavaScript object(key-value store) which holds contextual data to display in the module
attach: A callback after the template string is rendered in the DOM.options: A JavaScript object(key-value store) which holds any special attachment options passed in byrender.*calls.elements: An array of jQuery DOM elements from the rendered template. You can use this to restrict your binding to only the elements added by the template.
var renderComponent = {
  template: function (context) {
    return '<h1>Hello</h1>';
  },
  attach: function (options, elements) {
    // Do some Binding
    // $.filterFind is not a native jQuery function
    $(restrictTo).filterFind('h1').css('color', 'red');
  },
};
If you want to see a barebones project using Render Components, I have a project on GitHub.
In order to get the style, script, and other module dependencies to flow with each Render Component, we will be using RequireJS, a dependency loader and manager. I first thought of RequireJS as a backend on the frontend because I was used to assembling the whole page in PHP/Python on the server and sending it out to the client. As I started getting into RequireJS, it became clear that it is much more and thrives as a way to serve all of the different pages/content in a single page web application.
Things to know before getting started
Demo
Source Code (finished)
A fully functional demo of what will be created using this guide is available on the GitHub project pages for the repo.
You can also find the source code for the finished project on GitHub so you can reference it at any time.
This guide looks long(because it is not paginated) but it can be accomplished in 30 minutes.
To actually utilize the Render Components, we will be using renderer.js and renderer.helper.js (included in the getting started package) which is available on GitHub.
If you do not want to deal with the Sass, download the CSS files instead. You can use your own favorite Sass compiler but in this guide, I will be using Gulp to compile the Sass(.scss) files into CSS. There is already a gulpfile.js so just navigate to the project directory and run npm install once to install the dependencies and then the gulp command whenever you want to recompile. I realize this is a burden because you need Node.js, so I have linked the complete and compiled CSS wherever I am using Sass;
You will find that each module follows the same pattern.
Getting Started: Hello World
Download the Getting Started Video Site package on GitHub. This is a nice starting point because it includes all of the necessary scripts, basic styles, and assets.
Next we need to configure RequireJS. We are going to start with a "Hello World" type goal so you understand the basics of RequireJS and make sure things work at a basic level.
In js/require.conf.js:
// The following code is wrapped in this immediately invoking function
// Because the jsHint linter does not like the "use strict" tag dangling
// in the outer scope in case we concatenate a bunch of JavaScript together
// that is non-strict
(function () {
  'use strict';

  // Our RequireJS Configuration
  require.config({
    paths: {
      // Make sure to leave off the extension `.js`
      // module-name: path-to-script
      jquery: 'lib/jquery-1.11.1',
    },
  });

  // Do some Hello World
  require(['jquery'], function ($) {
    $(document).ready(function () {
      $('body').append('<h1>Hello World</h1>');
    });
  });
})();
In the index.html, add in the following script tag to the bottom of the <body>. This loads up our RequireJS configuration and includes the RequireJS library into the page. Note the trailing extension is omitted in the path to our configuration in the data-main attribute.
In index.html, add:
<script type="text/JavaScript" data-main="js/require.conf" src="js/lib/require.js"></script>You should now see a big "Hello World" when you visit index.html.
Your first Render Component
First we need to update our RequireJS configuration to add some more libraries and plugins.
In js/require.conf.js, update to:
// The following code is wrapped in this immediately invoking function
// Because the jsHint linter does not like the "use strict" tag dangling
// in the outer scope in case we concatenate a bunch of JavaScript together
// that is non-strict
(function () {
  'use strict';

  require.config({
    paths: {
      jquery: 'lib/jquery-1.11.1',
      'jquery-ui': 'lib/jquery-ui-1.11.1',
      'jquery-utility': 'jquery.utility',

      handlebars: 'lib/handlebars-v1.3.0',
      'handlebars-runtime': 'lib/handlebars.runtime-v1.3.0',

      'amd-loader': 'lib/amd-loader',
      hbs: 'lib/require-hbs',
      css: 'lib/require-css',

      renderer: 'renderer',
    },
    shim: {
      'jquery-ui': {
        deps: ['jquery'],
      },
      'jquery-utility': {
        deps: ['jquery'],
      },

      handlebars: {
        exports: 'Handlebars',
      },
      'handlebars-runtime': {
        exports: 'Handlebars',
      },
    },
  });

  // Your Hello World code here...
  // It can stay for now
})();
Next: Create a folder called pages at the root of the project and then create a file called video.page.js in that folder.
We are using Guy Bedford's awesome RequireJS plugins, require-hbs and require-css, in the following snippet. Don't worry, the plugins are already included in the Getting Started package.
In pages/video.page.js:
define(['hbs!./video/video', 'css!./video/video', './video/video.bits'], function (
  tmpl,
  videocss,
  videoScriptBits,
) {
  return {
    template: tmpl,
    attach: function (options, elements) {
      // You can do stuff here
      // even return some methods

      // Bind some stuff
      videoScriptBits.bind(elements);
    },
  };
});
In pages/video/video.hbs:
<div class="player-area">
  <div class="player-wrapper">
    <video></video>

    <div class="player-wrapper-resize-handle ui-resizable-handle ui-resizable-s">
      <svg class="icon">
        <use xlink:href="#shape-resize-vertical-handle" />
      </svg>
    </div>
  </div>
</div>

<div class="bottom-area">
  <div class="info-wrapper">
    <div class="info-box">
      <h2>Info</h2>
    </div>

    <div class="comments">
      <h2>Comments</h2>
    </div>
  </div>

  <aside class="suggestion-sidebar">
    <h2>Suggestions</h2>
  </aside>
</div>
Download the styles for this page module and save it as pages/video/video.scss. Here is the CSS file if you don't want to deal with Sass.
Download the JavaScript for the page module and save it as pages/video/video.bits.js
To render the page module, Add the following pages module to the bottom of the paths object in the RequireJS configuration. Don't forget the trailing comma on the line above
In js/require.conf.js:
'pages': '../pages'Also, change the "Hello World" block from before, at the bottom of our config, to the following
In js/require.conf.js:
// Load up the video page
// This is sort of like an initialization of the application
require(['require', 'jquery', 'renderer'], function (require, $, renderer) {
renderer.append(
'pages/video.page',
{
/*context*/
},
{
/*attachOptions*/
},
$('body'),
function (attachReturn) {
// ...
},
require,
);
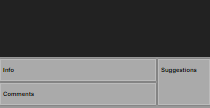
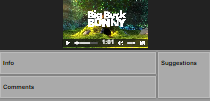
});Compile the Sass files if necessary, and refresh the index.html page. You should see a wireframe-like structure of our video site.
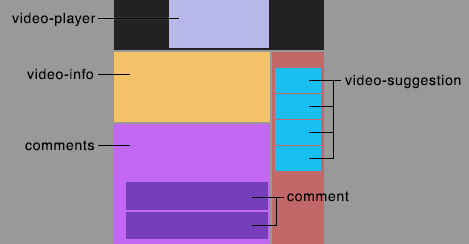
To give you a sense of all the modules and how they fit in, here is a nice diagram:
Adding the player module
As you will see, the modules of the page are set up the same way the over arching page is. There is no special styling or scripts for this module because the <video> element takes care of it all. All we have to do is give it the src path to the video in the Handlebars template. Create a modules folder in the root of the project.
In modules/video-player.module.js:
define(['hbs!./video-player/video-player'], function (tmpl) {
  return {
    template: tmpl,
    attach: function (options, elements) {},
  };
});
In modules/video-player/video-player.hbs:
<video src="{{video-src}}" controls></video>Add the following modules module to the bottom of the paths object in the RequireJS configuration.
In js/require.conf.js:
'modules': '../modules'We need to add some context to fill in the {{video-src}} Handlebars expression above in the template.
In js/require.conf.js:
// ...

// The variables we are going to pass into our template
var context = {
	'video-src': 'video/big_buck_bunny.webm',
};

renderer.append('pages/video.page', context, {}, $('body'), function(attachReturn) {

// ...
Next, we need to update our video page to actually use this module.
The following makes use of our js/helpers/renderer.helper.js Handlebars helper, which makes it easy to inline Render Components in our Handlebars templates. Keep in mind that this helper relies js/renderer.js which you can use to render Render Components on the fly in your own scripts.
In pages/video/video.hbs, update:
<div class="player-area">
  <div class="player-wrapper">
    {{@helpers/renderer.helper module="modules/video-player.module" }}
  </div>
</div>
You should now have a playable video on the page.
Adding the video info module
In modules/video-info.module.js:
define(['hbs!./video-info/video-info'], function (tmpl) {
  return {
    template: tmpl,
    attach: function (options, elements) {},
  };
});
In modules/video-info/video-info.hbs:
<h2 class="video-info-title">{{video-title}}</h2>
<div class="video-info-description">{{video-description}}</div>
Add more information to the page context.
In js/require.conf.js:
// ...
var context = {
  'video-title': 'Big Buck Bunny',
  'video-description':
    "Big Buck Bunny (code-named Peach) is a short computer animated comedy film by the Blender Institute, part of the Blender Foundation. Like the foundation's previous film Elephants Dream, the film was made using Blender, a free software application for animation made by the same foundation. It was released as an Open Source film under Creative Commons License Attribution 3.0. - Wikipedia",
  'video-src': 'video/big_buck_bunny.webm',
};
// ...
In pages/video/video.hbs, update:
// ...
<div class="bottom-area">
  <div class="info-wrapper">
    <div class="info-box">{{@helpers/renderer.helper module="modules/video-info.module" }}</div>
  </div>
</div>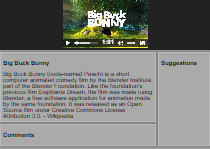
Adding the Commenting System
The Commenting System module is the most complex for this project because it has sub-modules, script binding, and styles.
In modules/comments.module.js:
define([
  'hbs!./comments/comments',
  'css!./comments/comments',
  './comments/comments.bits',
], function (tmpl, commentscss, commentsScriptBits) {
  return {
    template: tmpl,
    attach: function (options, elements) {
      commentsScriptBits.bind(elements);
    },
  };
});
In modules/comments/comments.hbs:
<h2>Comments</h2>

<div>
  <form class="comment-form">
    <input type="text" class="comment-form-name-input js-name-input" placeholder="Your Name" />
    <br />
    <div class="comment-form-message-input">
      <textarea class="js-message-input" placeholder="Say something..."></textarea>
    </div>
    <br />
    <input type="submit" value="Post" />
  </form>
</div>

<ul class="comment-list">
  <li>Sample comment</li>
  <li>Don't worry, we will replace these soon</li>
</ul>
Download the styles for this page module and save it as modules/comments/comments.css. No Sass in this one.
We will come back to this script after we have the comment sub-module complete:
In modules/comments/comments.bits.js:
define([
  'module', // we can use `module.id` for binding or something...
  'jquery',
  'jquery-utility',
  'renderer',
  'require',
], function (module, $, $utility, renderer, require) {
  'use strict';

  return {
    bind: function (restrictTo) {
      // Set restricTo default
      restrictTo = typeof restrictTo !== 'undefined' ? restrictTo : $(document);

      $(document).ready(function () {
        $(restrictTo)
          .filterFind('.comment-form')
          .on('submit', function (e) {
            e.preventDefault();

            // We will fix this up later using the actually `comment` module
            $(restrictTo).filterFind('.comment-list').append('<li>Heya, I loved this video</li>');
          });
      });
    },
  };
});
In pages/video/video.hbs, update:
// ...
<div class="bottom-area">
  <div class="info-wrapper">
    // ...

    <div class="comments">{{@helpers/renderer.helper module="modules/comments.module" }}</div>
  </div>
</div>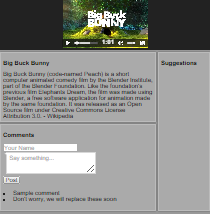
Adding the Comment sub-module
In modules/comments/modules/comment.module.js:
define(['require', 'hbs!./comment/comment', 'css!./comment/comment'], function (
  require,
  tmpl,
  commentcss,
) {
  return {
    template: tmpl,
    attach: function (options, elements) {},
  };
});
In modules/comments/modules/comment/comment.hbs:
<li class="comment">
  <img src="{{avatar-src}}" class="comment-avatar" />
  <div class="comment-body">
    <h4 class="comment-name">{{name}}</h4>
    <div class="comment-message">{{message}}</div>
  </div>
</li>
Download the styles for this page module and save it as modules/comments/modules/comment/comment.scss. Here is the CSS file if you don't want to deal with Sass.
Compile the Sass.
Update the context to add in some comments to display.
In js/require.conf.js:
var context = {
  // ...
  'comment-list': [
    {
      name: 'Eric',
      message: 'Lorem ipsum dolor sit amet, consectetuer adipiscing elit.',
      'avatar-src': 'https://secure.gravatar.com/avatar/ac5413?s=64&d=identicon',
    },
    {
      name: 'MLM',
      message: 'Aenean commodo ligula eget dolor. Aenean massa.',
      'avatar-src': 'https://secure.gravatar.com/avatar/ab1234?s=64&d=identicon',
    },
  ],
};
In modules/comments/comments.hbs, update:
// ...
<ul class="comment-list">
  {{#each comment-list}} {{@helpers/renderer.helper module="modules/comments/modules/comment.module"
  }} {{/each}}
</ul>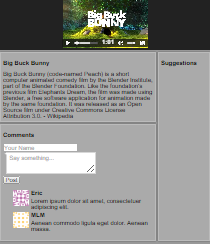
Add in video suggestions, finishing it off
Lastly, we need to add in the video suggestion in the sidebar. By now you probably have the hang of Render Components and could probably try doing this last module on your own before reading on. Use the context below as a guide on how you would set up the template.
In js/require.conf.js:
var context = {
  // ...
  'video-suggestion-list': [
    {
      'video-title': 'Lorem Ipsum',
      'thumbnail-src': 'https://secure.gravatar.com/avatar/e1e1e1?s=64&d=identicon',
      'channel-name': 'Dummy',
      'view-count': 23921685,
    },
    {
      'video-title': 'Aenean massa',
      'thumbnail-src': 'https://secure.gravatar.com/avatar/aeeaaa?s=64&d=identicon',
      'channel-name': 'Dummy2',
      'view-count': 2364,
    },
  ],
};
In modules/video-suggestion.module.js:
define([
  'hbs!./video-suggestion/video-suggestion',
  'css!./video-suggestion/video-suggestion',
], function (tmpl, css) {
  return {
    template: tmpl,
    attach: function (options, elements) {},
  };
});
In modules/video-suggestion/video-suggestion.hbs:
<div class="video-suggestion">
	<img src="{{thumbnail-src}}" class="video-suggestion-thumbnail" />
	<div class="video-suggestion-body">
		<h3 class="video-suggestion-title">{{video-title}}</h2>
		<div class="video-suggestion-channel-name">
			{{channel-name}}
		</div>
		<div class="video-suggestion-view-count">
			{{@helpers/toCommaSepNum.helper view-count}} views
		</div>
	</div>
</div>
Download the styles for this page module and save it as modules/video-suggestion/video-suggestion.scss. Here is the CSS file if you don't want to deal with Sass.
In pages/video/video.hbs, update:
// ...
<div class="bottom-area">
// ...
<aside class="suggestion-sidebar">
<h2>Suggestions</h2>
{{#each video-suggestion-list}} {{@helpers/renderer.helper
module="modules/video-suggestion.module" }} {{/each}}
</aside>
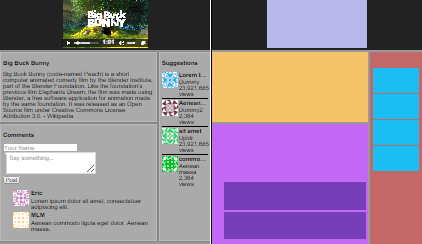
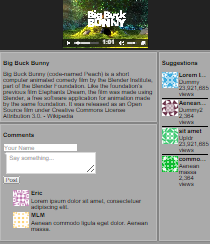
</div>You should now have a complete pseudo-YouTube video site made with Render Components:
Looking for more examples?
Check out my two open source Unity games on GitHub (Radius and Super Bounce). These projects are from before I figured out all the best practices for this article but the core idea is the same.